Speaker Test: Let's Walk You Through
Speaker TestPerforming thorough tests on your speaker will help you to identify and resolve any issues. Use the right tools and trust your ears to ensure your speaker functions at its best. |
Speakers are critical components in the sound and music industries. When fully operational, they have a wide dynamic range and stereophonic sound. However, an extended period of non-use can compromise their performance, causing them to malfunction.
Problems that may arise include loss of sound on one or both speakers, phase issues that lead to problems with spatial separation, and other bigger issues.
This can be detrimental to performers and sound engineers alike. Therefore, it is imperative to test speakers to ensure optimal performance.
But how do you go about testing your speakers? You will find all the technical details you need for speaker testing here.
Know Your Speakers And Their Parts
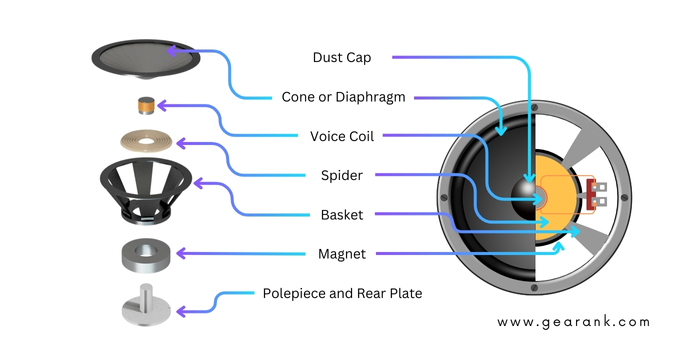
Before proceeding with the speaker troubleshooting process, it's imperative to have a comprehensive understanding of all the speaker components that need to be tested. This is because speaker issues may arise from several sources. Therefore, testing all the relevant components is essential to ensure they function correctly. Here is a list of the most common parts of a speaker that need to be tested during the troubleshooting process:
-
Dust cap: Covers the middle section of the cone to prevent debris from entering the gap between the magnet and pole piece, where the voice coil is located.
-
Cone or Diaphragm: The component of a speaker that oscillates back and forth to create pressure waves in the air, interpreted as sound by your ears. It is commonly composed of paper, plastic, or metal.
-
Voice coil: A voice coil is a wire wrapped around a magnet, which produces a magnetic field when current flows through it. This field interacts with the permanent magnet to cause movement of the voice coil and cone.
-
Basket: Holds the entire speaker assembly together and attaches it to the cabinet. It is also called the frame.
-
Top plate: The top plate is a metal plate that sits above the magnet, forming one side of the gap where the voice coil moves. It helps to focus the magnetic field in the gap.
-
Spider: A flexible ring that supports the voice coil, keeps it centered in the gap and helps control the cone's movement to prevent over-excursion.
-
Magnet: The part of the speaker that generates the permanent magnetic field within the gap can be constructed from materials such as ceramic, ferrite, neodymium, or other similar substances.
-
Polepiece and rear plate: The metal parts on the other side of the gap help focus the magnetic field and move the voice coil.
Visual inspection is the first step in identifying potential performance issues with your speaker. A damaged speaker cone, for instance, can significantly impact the quality of sound produced by the speaker. Therefore, inspecting the speaker cone and its components carefully is crucial.
You should also examine the wires, audio cables, and cable connectors. These components are delicate and prone to damage, resulting in poor sound quality. Any loose wires or broken connectors should be immediately replaced to prevent further damage.
How To Test A Speaker
There are lots of ways to test a speaker. Here are some common techniques to try.
Speaker Test - Wires And Connectors
Checking the wires and connectors regularly is important if you're using a wired speaker. Even if they appear in good condition, there may be loose wires, connections, or problems with the jack. The most effective way to do this is to test the resistance of the wires.
-
Start by taking a multimeter and setting it in resistance mode.
-
To measure the current flow, attach both wires to the corresponding positive and negative terminals on the multimeter.
-
If the multimeter reads above 0, your wires are fine.
-
If you tested the left speaker, do so with the right speaker as well.
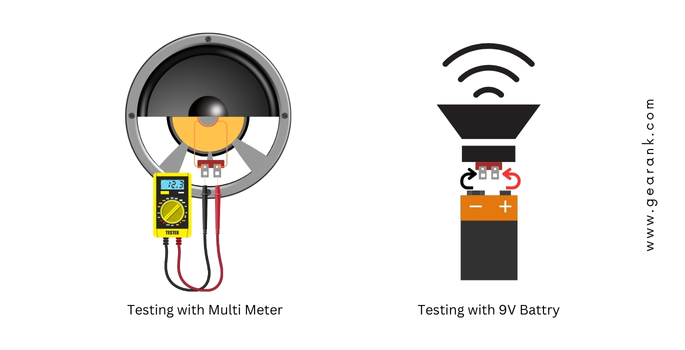
Testing Speakers With A Battery
If you want to perform a speaker test using a battery, you will need a 9V battery.
The battery process checks if the speaker is still capable of making sound when a current is passed through it. It may still produce sound even when some parts are damaged.
Here are the detailed steps to follow in order to connect the wires to the battery and speaker safely:
-
First, you need to attach the wires to the positive and negative battery terminals. It's important to ensure that the wires are tightly attached to the terminals to prevent any electrical mishaps.
-
After attaching the wires to the battery, take the other ends of the wires and connect them to the positive and negative speaker terminals. Again, make sure that the wires are securely connected to the speaker.
-
Once you have connected the wires to the battery and speaker, check the speaker for any pulse. A pulse indicates that your speaker is functioning properly. If you hear no sound from the speaker, try adjusting the wires to ensure that they are properly connected.
The battery process checks if the speaker is still capable of making sound when a current is passed through it. It may still produce sound even when some parts are damaged. Using a multimeter to measure resistance in the circuit is the next step.
Using A Multimeter To Assess Damaged Circuitry
To test the wires, follow these steps: First, put the multimeter in Resistance(Ω) mode. Then, connect each end of both wires to the positive and negative leads of the multimeter, respectively. The wires are good to go if the multimeter shows any value more than 0 on the screen. However, if the value is 0, you need to change the wires.
To test the speaker's circuit, follow these steps: First, connect both ends of the speaker to the multimeter's positive and negative leads. Then, if the multimeter produces a continuous tone, it indicates a problem with the speaker's circuit. The digital display might indicate "0.L" in such cases.
Testing Speakers for Speaker Cone Damage
If you have completed the speaker check and the multimeter/battery test with positive results, there is one more step left.
Manually test your speakers by setting them up and playing a song or two to evaluate their performance. Choose the best songs in your playlist that you are familiar with.
This is one of the most effective ways to test the speakers since your ears can detect any issues, such as:
-
Poor sound quality
-
Playback issues
-
Volume issues
-
Phase issues
-
Frequency response issues
Using your ears instead of devices to test your speakers is better. Play some music and listen carefully. If the sound quality is good, your speakers are good. However, noticing any distortion or fluctuating volume is a sign of more significant issues with your speakers.
Apart from listening, you can also use other senses to test your speakers. If you detect any burning smell or see smoke, it indicates electrical problems. In such cases, disconnect the speakers immediately to avoid any potential hazards.
If everything about the speaker is good, and you're still getting crackling or other unwanted noise, then you ought to check your other audio equipment, including the mixer, cables, the amplifier, etc. Check if your stereo signal setup is properly wired.
If you're speaker is connected to a computer, then you'll have to check the audio settings in its operating system, apps, or browser. You can also connect your speaker to a different device or amplifier, to confirm if its an amp issue.
Final Thoughts
It's not enough to play a few tracks and call it a day when you do a speaker test. To ensure that all critical parts of your device are functioning correctly, you should conduct tests using multimeters and batteries. Testing the left speaker and right speaker and ensuring both sound good will save you a lot of trouble down the line. This will give you a more in-depth understanding of any issues with your speaker.
Additionally, consider the value of your hearing as a tool for diagnosing problems. By listening to the audio output of your speaker, you can quickly identify any abnormalities.
Performing thorough tests on your speaker will help you to identify and resolve any issues. Use the right tools and trust your ears to ensure your speaker functions at its best.
Frequently Asked Questions
How do speakers work?
A dynamic speaker is a device that converts electrical signals into sound that we can hear. The speaker wire carries these signals to a coil that is wrapped around a flexible diaphragm.
This coil creates a magnetic field that interacts with a permanent magnet, causing the diaphragm to vibrate and produce sound waves. These sound waves travel through the air and into our ears, allowing us to hear the music, speech, or other sounds being played through the speaker.
Depending on whether it's a Powered vs Passive Speaker, the principle only varies with where the electrical current gets amplified.
What do I need to test my speakers?
The required tools to test your speakers depend on the type of testing method you use.
For instance, if you use the multimeter method, you will need a multimeter, two multimeter probes, and two pieces of wire.
On the other hand, the battery method requires a 9V battery and some wire. Refer to the guide above for more ways to perform a speaker test.
Contributors:
- Alexander Briones - Editor
- Jerry Borillo - Illustrator