How to Record Music Step by Step
The question of "How to record music" is one that starts many a career. Multitrack recording is a widely used technique for capturing multiple individual tracks that can be later edited, mixed, and converted into a musical composition.
This recording method enables the playing of pre-recorded tracks while recording a new one on top of them, thereby facilitating complex musical arrangements.
In this article, we will delve into the technical details of the step-by-step process for how to record audio, which can be easily followed by experts. With this knowledge, you can set up your own home studio and produce music of your choice.
Steps on How to Record Music
Ready to start recording a song? The music production process involves a set of essential steps that must be followed to ensure a high-quality recording. It requires the use of specific tools and skills to execute each step appropriately.
In this regard, it is crucial to have a good understanding of the recording process to achieve the desired results.
Below are the technical details of the steps involved in the music production process, which an expert audience can easily understand.
Step 1: Preproduction
Before you start recording, it's crucial to meet with the artists beforehand and plan for the upcoming session. A demo tape or a simple recording of the artist's song can be helpful in giving you an idea of what you could do with the song. When planning the recording, it's essential to consider the order of the tracks that will be recorded and determine which comes before and after each track.
To start the recording process, record some essential electronic parts, such as drum loops or a MIDI keyboard, which could be used later as a reference. During the actual recording session, these parts could be replaced with live instruments.
One important aspect of music production is ensuring that all the equipment in your home recording studio is functioning correctly. This is similar to doing a sound check before a live show, where you have a checklist of things to go through.
To ensure a smooth and successful recording session, line-check, monitor check, and check the room sound or reflected sound. By doing this, you can be confident that your home studio setup is in good condition and that there will be no delays or problems during the recording session delays or problems. This also allows you to eliminate unwanted noise early on.
Step 2: Recording
Plug in your gear into your audio interface input. Use your DAW to record the initial tracks you need. During recording, it's advisable to capture several takes for each part. This will provide you with more flexibility during editing.
Once you have captured the necessary tracks, such as the drums, it's essential to identify any parts that require redoing. You should trim and cut any unwanted sections where you made mistakes, such as playing notes that are out of tune or time.
You can punch in new recordings on the faulty parts to improve your recorded track.
Step 3: Editing
It is common practice to start with the drums when recording a band. The drummer acts as a metronome for the rest of the band, setting the rhythm and tempo for the entire song.
However, if the drummer misses a beat or plays slightly off-time, it can affect the other musicians and potentially ruin the recording.
To fix this issue, the use of quantization is recommended. This process accurately aligns the imprecise musical notes with the beat, resulting in a more natural-sounding recording.
For MIDI drums, you can still edit the midi track after recording.
For non-drum tracks, editing before and after overdubbing is possible. If you prefer a better feel for the song, edit your initial tracks before overdubbing.
Alternatively, editing after overdubbing is a viable option if you're content with your initial unedited tracks and want to save time.
Step 4: Overdubbing
After setting up the initial recordings and editing, it's time to incorporate other instruments and vocal parts. This involves playing the pre-recorded tracks and simultaneously recording a new track or double-track on top of them.
Double tracking is typically used for lead vocals as it produces a richer and fuller sound, enhancing the overall power of the vocals. You can also structure your tracks at this stage according to your desired arrangement.
Additionally, overdubbed parts will be further edited to enhance the overall quality of your tracks.
Step 5: Post-Production
Mixing: During the mixing stage of music production, the individual tracks are combined to form the final song. The initial volume control levels and panning are set at this stage to achieve the desired overall sound.
Additionally, each track undergoes EQing and effects processing to combine them as a unified whole rather than sounding like separate recordings. This process ensures that the final mix sounds polished and cohesive.
If you use software instruments, you can easily swap them out at this stage. If they consume too much resources, you can bounce or freeze them into a processed track. This principle applies when making a backing track.
Mastering: This is the final step, where a mastering engineer will fine tune a high-quality recorded track, and optimize it to ensure consistency across all recordings. The aim is to achieve a final master that is ready for distribution.
This process involves technical details such as equalization, compression, stereo enhancement, and limiting to enhance the overall sound quality.
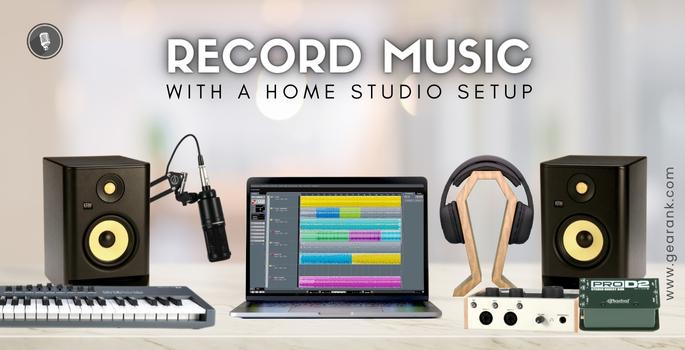
What Equipment Do You Need for Recording Music?
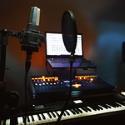
The equipment used in a home recording studio setup serves as the fundamental building blocks of the audio recording process. Each tool is designed to serve a specific purpose, and its efficient usage is crucial to ensure the overall success of the recording process.
-
Computer or Laptop: When it comes to choosing a laptop or computer for music recording, the processing power is crucial. Look for a device with a multi-core processor that can easily handle complex tasks. Additionally, a generous amount of RAM and decent hard drive space is necessary to ensure the smooth operation of your DAW software and provide sufficient storage for your files.
-
A lower-spec laptop may struggle to run a DAW efficiently, while a device with insufficient specs may experience lags and even crashes during operation.
-
Therefore, opting for a device with fast processing power, ample RAM, and sufficient storage space is recommended to ensure a seamless and productive music recording experience.
-
Recording Software:
A DAW or digital audio workstation software is an application that allows your computer to record, edit, mix, and master music.
-
It is an essential part of a professional recording studio. DAWs offer a range of features, including recording audio and editing audio, MIDI sequencing, mixing, arranging, and mastering. These features make it possible to produce high-quality music using a computer.
-
If you want the best DAW software, consider well-known brands such as Pro Tools, Logic Pro X, Ableton Live, and FL Studio. These software options have various features and functionality to make your music production experience seamless. For those who want to test the water, there are free DAW options available, but they aren't completely free, you'll need to pay extra to get the better features.
-
Besides the core features, DAW software also supports plugins that allow you to add virtual instruments and effects to your music production. These plugins can emulate the sound of real instruments, amps, pedals, speaker cabinets, and mic placements to give your music a realistic sound.
-
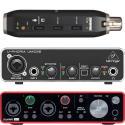
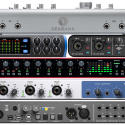
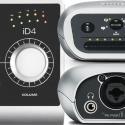
Audio Interface:
Audio interfaces are hardware devices that facilitate the input and output of audio signals between your computer and other audio equipment. It typically includes a preamp for multiple microphones or instrument inputs and outputs for your studio monitors or headphones.
The most crucial function of an audio interface is to convert your instrument's electrical signal into a digital signal that your computer can process. This conversion process uses an analog-to-digital converter (ADC), which samples the incoming signal and converts it into a series of digital values.
Some popular audio interface brands include Focusrite Scarlett 2i2, PreSonus AudioBox, and Universal Audio Apollo Twin. These devices offer a range of features and capabilities, including high-quality preamps, low-latency monitoring, and compatibility with various software applications.
-
Microphones:
Microphones are transducers that convert acoustic energy into electrical energy. A vocal mic is designed to capture the human voice or any sound produced by an instrument or a speaker.
The most commonly used microphones for home studio recording are dynamic, condenser, and ribbon microphones.
Dynamic microphones are ideal for recording loud sound sources such as drums and guitar amps, as they have a high resilience to sound pressure levels and can capture a wide dynamic range.
In contrast, condenser microphones are more suitable for capturing detailed recordings like vocals or acoustic instruments such as an acoustic guitar. Ribbon microphones can deliver a more natural and accurate sound when recording vocals up close.
Examples of these microphones include the Shure SM57 dynamic microphone, the Audio-Technica AT2020 condenser microphone, and the AEA R84 ribbon microphone.
Note: To minimize the popping sounds caused by fast-moving air from plosives like "p," "t," and "b" sounds, a pop filter is a necessary item for recording. The filter is placed between the microphone and the sound source (like the singer's mouth) to reduce the impact of plosives on the microphone.
-
Instrument: Musical instruments serve as the medium through which instrumentalists create music, just as vocalists use microphones.
Guitars (acoustic or electric), drums, pianos, and keyboards are among the most prevalent instruments used in recording.
However, the choice of instruments can vary depending on the musical arrangement or genre of the song under consideration.
-
Cables: You will require appropriate cables to establish connectivity between your equipment. XLR cables are recommended for microphones, while instruments should be connected using instrument cables.
Connecting your audio interface to studio monitors necessitates a TRS cable. Additionally, you should keep a 1/4" cable and a speaker cable handy for any unforeseen requirements.
-
Headphones or Studio Monitors: To properly monitor and hear the sound of your recording, it is necessary to use headphones or studio monitors.
Headphones offer excellent sound isolation and are space-saving, making them ideal for monitoring. When it comes to music production, open-back headphones are the best choice. Closed back headphones are also useful for tracking.
Studio monitors are far superior to laptop speakers if you want to achieve a faithful representation of your recorded audio. High-quality studio monitors are designed to produce an accurate and detailed sound that is true to the original recording, making them essential for professional audio production. Whether you are working on your own or some else's song.
-
DI box: This transformer-based device converts unbalanced signals from instruments to balanced signals. It features an input jack for the instrument and an XLR output jack for connecting to a mixer or audio interface.
Sound technicians, DJs, and musicians commonly use this compact and versatile equipment in live instrument performances and professional studios.
Note: Once you've recorded your tracks, you can remap them using a ramp box and amplifier to achieve a more natural sound. However, this involves an additional recording process, which you may choose to forego if you are satisfied with the actual sound produced by your DAW plugins.
-
Acoustic Treatment: Having a quiet room to record in is crucial in getting clean sounding tracks. And to achieve this, a lot of factors come to play, including location, environmental noise, neighbor distance and tolerance, and many more. Having your room professionally treated will get you the best result, but there are also DIY ways to reduce unwanted noise when recording.
Why Record Your Own Music?
As an experienced musician, you're likely aware of the benefits of recording your own music. With the advent of more affordable recording equipment, you now have the option to record without spending a fortune on studio time.
Recording offers a unique experience that is different from performing live. When you begin to record your own music, you'll notice subtle nuances in your playing that might have gone unnoticed during live performances.
Additionally, the recording process entails listening to and blending multiple tracks, which will sharpen your ear for music production and enhance your overall musicianship.
If you have the proper setup, you can create a professional-level recording that can be distributed and monetized. Who knows, your next recording could be a breakthrough hit.
You can also do rough recordings when writing songs or polishing musical ideas.
Tips for a Great Recording
We've covered the essentials of recording music. Here are some tips to help you achieve a great recording.
Invest in Quality Equipment
To ensure you get the best results, invest in high-quality equipment. Take the time to research and understand the technical specifications of each product to ensure that it meets your requirements and delivers the desired sound output.
It is also advisable to test the equipment yourself or read expert reviews to fully comprehend each product's capabilities. Doing so enables you to make an informed purchase and secure only the best-quality equipment for your recording needs.
Practice
Rehearsal is a vital aspect of recording music and applies to all recording techniques. The more you practice recording, the more you learn and gain experience, enhancing your skill set.
In addition to your own compositions, you can also try recording your peers' music. Ongoing learning is critical, and taking on new recording tasks will offer you an excellent opportunity to advance your knowledge and abilities.
Pick Your Style
When recording music, one key aspect to consider is your personal style. To create a unique and distinctive sound, it is important to take the time to listen to different genres and artists and figure out the style you want to develop.
Listening to various music genres is the most crucial tip to help you find your style. This includes everything from classical music and jazz to hip-hop and electronic music. Once you have explored various styles of music, you can then start refining the type of sound you want for your own recordings.
A helpful technique is finding artists who inspire you and using their style as a foundation for creating your own music. It is also recommended to experiment with different sounds and techniques to discover what works best for the style you are aiming for.
By taking these steps, you can establish a unique sound that sets your recordings apart and gives them a distinct personality.
Final Thoughts
The steps on how to record music must be followed meticulously to achieve optimal results. Having the necessary equipment in place before commencing the recording process is essential. As an expert, it is imperative to follow each step precisely to develop your skills and produce high-quality recordings suitable for commercial distribution.
Once you have developed your skills and confidence, you may experiment with various approaches to create unique recordings. Producing recordings you enjoy is crucial, as this tends to result in the best-sounding records. Remember, the recording process is technical and requires attention to detail to create music that resonates with your audience.
Frequently Asked Questions
Can I Use Effects When Recording the Tracks?
While recording tracks, it is generally recommended to keep them dry and add effects in post-production. This approach provides greater flexibility and control over the final sound of each track.
However, if desired, effects can be added during the recording to enhance the artist's performance and provide comfort during overdubbing. Ultimately, the choice between recording with or without effects depends on the specific preferences of the artist and the desired outcome of the recording.
Which is Better for Recording Vocals: Condenser or Dynamic Microphone?
The choice between condensers and dynamic microphones depends on the audio recording situation. While the former is highly effective in capturing subtle details for a nuanced vocal track, it works best in a well-controlled studio setting.
On the other hand, the latter is more appropriate for live events, as it can efficiently handle loud external noise and focus on nearby audio sources, such as vocals and speakers.
Contributors:
- Jerome Arcon - Co-writer
- Jerry Borillo - Illustrator