DIY Bass Traps - The Design to Absorb Your Excess Bass
DIY bass traps are a low-cost solution to a pervasive problem in the home recording studio - muddied recordings from bouncing sound waves.
Professional studio set-ups can target excess wavelengths effectively with purpose-built spaces. In the home studio, we have to get a little more creative.
While you might be familiar with acoustic panels and other forms of DIY acoustic treatment, low frequencies can still plague recordings. Too strong for simple panels, these long wavelengths can ruin the clarity of a track.
A DIY bass trap is designed specifically to target these low ranges. They're easy to build and cost-effective, combining wooden frames with thick insulation.
Learn how to make your own DIY bass traps, and how to use them, with this guide.
What Is A Bass Trap?
Bass traps are designed to do as they say -- "trap" bass when recording sound. They are made from soft materials that slow down the energy of vibrating air molecules.
This results in reduced low-end frequencies, which tightens the sound for better recording and monitoring.
If you're familiar with acoustic panels and tiles, then you're familiar with the general purpose of bass traps.
Made from soft materials, acoustic tiles absorb sound waves to remove residual noise. Bass traps do much the same but at the lower end of the sound spectrum.
Bass exists on a lower frequency with a longer wavelength. These strong and long wavelengths can travel far and are hard to disperse. Standard, thin acoustic tiles won't absorb these low frequencies.
This means bass sound tends to build up, particularly at boundaries (aka walls).
Low frequencies are prevalent in the corners, where two boundaries meet. The waves bounce back and forth between the two walls, creating little pools of bass.
Made from thick materials, low frequency traps are placed in the corner of rooms to stop low-frequency build-up.
They transform the energy from vibrating molecules to heat, rather than sound. With bass traps in place, you can enjoy a much cleaner bass response when recording music.
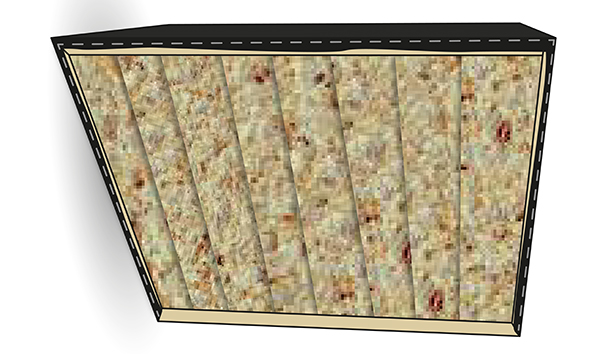
Bass traps themselves are essentially thick slabs of soft material. They tend to be made from fiberglass or rock wool. Foam can also be used in bass traps, but it's less effective.
You can buy pre-made ones for use in a home studio, or you can make your own. For home use, DIY bass traps are typically inexpensive and effective.
How To Build DIY Bass Traps
Each bass trap requires some hands-on work, but very little DIY expertise. The basic structure of these acoustic absorbers is relatively simple. You don't even need to break out the tool kit.
What You Need
-
Insulation panels. I recommend choosing fiberglass or rock wool for the interior of your audio treatment. Owen Corning 703 is a good choice, or try Rockwool Rockboard. If your budget is restricted, you can use foam instead. You'll typically need 2 panels for each trap. But if you pay for a thicker material, then you'll need fewer.
-
1" x 4" lumber. Each panel will measure roughly 2' x 4', so get enough lumber for the number of traps you're making. You can cut it down yourself, order it by the foot, or get it cut to size in a hardware store.
-
Breathable fabric. The breathable fabric covers the bass trap. This will stop the insulation from falling out and it creates a more attractive finish. It's worth buying a large amount to ensure you have enough for each panel. Any excess fabric can be used in future DIY projects.
These items form the basis of your bass trap. For assembly, you will need:
-
Wood glue. Wood glue is a quick way to secure the frame. However, if you have some DIY experience, you might prefer to use screws and an electric drill. This frame is likely to last a little longer.
-
Duct tape. The insulation should fit comfortably inside the frame without restraint. However, it's worth using a few pieces of duct tape to keep everything together.
-
Staple gun. This is used to secure the fabric to the frame.
-
Tape measure. The old adage "measure twice, cut once" is good advice. Be careful with your measurements to ensure a secure frame.
-
Shelf brackets/wire. With your bass traps ready, you'll need to hang them. You can buy shelf brackets or picture wire, or try simply stacking the traps.
Step One: Build A Frame
With all your materials assembled, you're ready to start building bass traps.
One of the most important steps is the first one: cutting your lumber. Each side should measure roughly 48" x 24", and 4" deep. This interior should have enough space to slip in your insulation.
If you're cutting the lumber yourself, measure it around the audio panels. Mark the length and width of each panel, and follow these marks when cutting.
When you have your mount panels cut to size, you can assemble it. For a sturdy frame, use screw fastenings. Create guide holes with an electric drill before screwing all the corners together.
Alternatively, you can use wood glue. The overall build won't be as stable, but it should hold pretty well.
Step Two: Mount The Insulation Panels
If your measurements were accurate, then the insulation should slip easily into the wooden frame.
Stack each panel on top of the other. This should form a depth roughly 4 inches thick.
Place the panels into the frame. Ideally, each piece should be snug against the frame. But don't worry if the fit isn't perfect.
Secure the two insulation panels in place using duct tape. Wrap the tape around the panel and wood frame from front to back. Ensure the tape is secure at either end, so it won't pull loose.
You don't need much duct tape to secure the panels. Use one piece running from the top to the bottom, and one piece at either end.
Step Three: Cover With Fabric
The final step in creating our DIY audio panels is the fabric finish.
The fabric helps keep the trap together, creates an attractive finish, and softens the surfaces.
You want a breathable fabric, preferably with some stretch. Feel free to choose a fun pattern or design.
Cut out a large piece of fabric, measuring roughly 50" x 26".
Lay the fabric pieces flat on the floor and place your bass trap in the center. Pull the fabric tight across the top of the frame and staple the corners.
Repeat on the bottom and either side of the frame. Make sure to keep pulling the fabric tight.
When you've finished this, you should have a fully covered DIY bass trap!
One final step is hanging your traps. If you want to hand them like a picture, staple wire to the back of the frame.
Otherwise, attach heavy-duty brackets to the wall and place the traps on top.
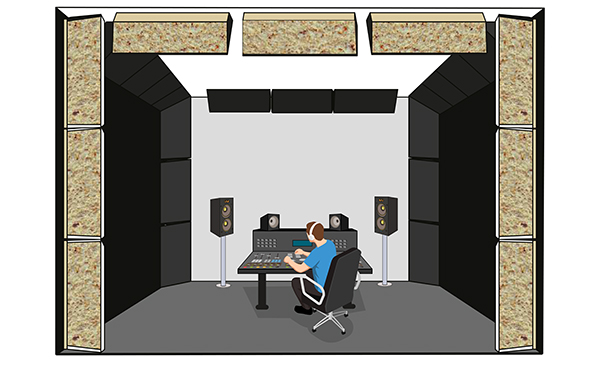
Placing Your DIY Bass Traps

The best place to put your own bass traps is in the corners of your recording and mixing space. Low-frequency wavelengths gather in these corners, bouncing back and forth from the boundaries.
DIY corner bass traps can give you good results. With strategic placement, corner traps can absorb the bass where it lingers.
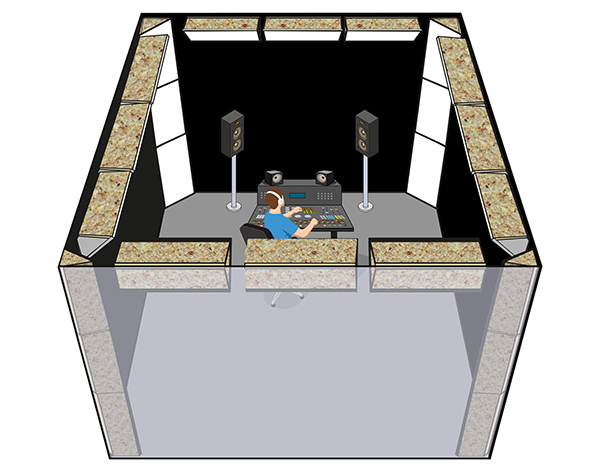
I recommend at least 4 traps for the room -- one in each corner. A bass trap in each of the four corners is a decent acoustic treatment.
If you can make eight, stack two in each corner. Stretching from floor to ceiling, they can help capture excess low frequencies, including the upper bass ranges.
The ideal placement is at a 45-degree angle. This traps an air gap behind and covers more of the corner.
Note that there are ready to use broadband bass traps that does a good job at dealing with corners, but they are pricier compared to DIY.
Frequently Asked Questions
How Many Bass Traps Do You Need?
Ideally, you should have enough to cover each corner from floor to ceiling.
However, two bass traps for each side, one in each corner can help capture low frequencies for a defined tone.
Do Bass Traps Help Manage Bass Frequencies?
The bass trap absorbs low bass frequencies, converting the energy to heat, rather than sound.
This creates an even response, tighter definition, and better balance.
So, even if you can't afford a proper acoustic treatment, it's worth making a DIY corner bass trap.
Conclusion
Bass traps help capture the powerful low frequencies that standard acoustic foam struggles with. Strategically placed in corners, these simple designs create a more balanced tone.
Have you noticed a difference in the quality of your recording when using DIY bass traps?