Basic PA System Setup Diagram - Showing You The Setup
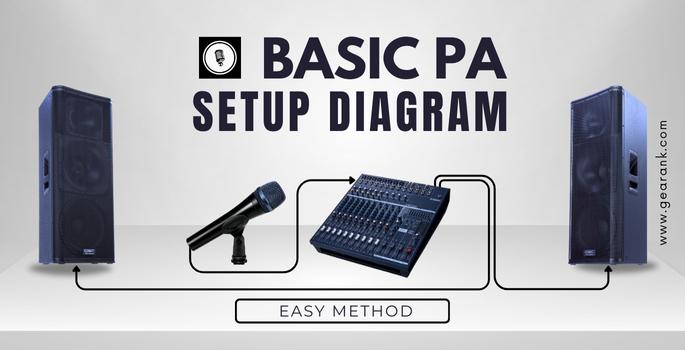
Basic PA System Setup DiagramA diagram that shows the different components of a PA System, and how they are interconnected. |
Performers and audio engineers share the same goal of wanting to deliver the best sound quality at every venue.
This starts with a basic understanding of sound system setups, which can help streamline your PA system and make it easy to communicate any adjustments.
To help you get better acquainted with sound systems, we present you with this basic PA system setup diagram, along with details on key equipment, and how they are interconnected.
Let's get started by answering this fundamental question, What Is A PA System?
What Is A PA System?
A PA system is a form of sound amplification used in concerts and live events. The 'PA' stands for 'public address' system. It got its name because it's predominantly used for speech. Now, it's a term used for a system that amplifies the sound source in small or large venues.
A simple PA system is made of three key components:
-
Microphone
-
Mixer / Amplifier
-
Loudspeakers
Below, we will give you a summary of how each component works.
Microphones
Microphones convert sound waves into electrical signals. Once the sound wave hits the diaphragm, it goes back and forth, giving off a positive and negative charge. This audio signal travels via the cables to the mixer then to the amplifier. Finally, the amplifier drives the speaker to project the audio signal.
So what type of mic are you most likely going to be using? For live performance, you will likely use a dynamic microphone. A dynamic microphone, compared to other mics, is durable and doesn't get damaged easily.
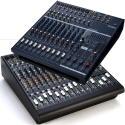
Sound Mixers
Mixers come between the microphone and the loudspeaker. They receive the signal from the microphone before the sound gets sent to the speakers. This is the part of the signal flow where the individual instruments, vocals, or accompaniment are set to the appropriate volume level.
Mixers are used to balance and process the signal. With this in mind, you also have to get familiar with its parts. Feel free to read our comprehensive breakdown of how a mixing board works.
For basic routing, most mixers have:
-
Input jacks for connecting mics and other sound sources.
-
Output jacks for connecting your headphones, monitors, and PA speakers.
-
Preamp gain for boosting the signal of the sound source.
-
Volume faders for adjusting the loudness level that goes through the speakers.
-
Phantom power (48v): auxiliary power used for condenser mics.
-
Channel EQ: For shaping the frequency of the sound source.
For example, in the mixer channel settings, you can find a channel fader. They adjust the volume of each channel signal before it moves on.
Not all PA systems use mixers, some portable PA systems let you connect directly to the amplifier. However, it's advisable to get a mixer for multiple instruments and sound sources. Also, most mixers let you shape your sound better, and you get good control over the blending of each channel. If you want to sound good, use a mixer.
The type of mixer you should get will depend on how many channels you need. The more channels you have, the larger the mixer you will need. Channels can build up quickly when you consider all the instruments, mics, stage monitors you use (each needing aux outputs), etc.
Keep this in mind when choosing a mixer. It needs enough input and output ports to connect with all your equipment. If you don't have enough inputs, you will not be able to capture everything at once.
So, all of these form the basis of your basic PA system. Connect everything with a few TRS and XLR cables and you have the bare bones of a simple PA system.
Main Speakers
Loudspeakers convert the voltage back into sound. The signal is amplified through a voltage boost enabling speakers to broadcast the sound but at a louder volume. This is how loudspeakers amplify your voice so the audience can hear you.
Your main speakers can come in two types. These are passive and active speakers. Passive speakers use a separate amplifier, they are dedicated speakers for amps. On the other hand, active speakers have the amplifier built into their cabinet.
It's important to keep in mind that you should not connect an external amplifier to an active speaker. Again, active speakers are already amplified. Otherwise, you'll be damaging your speakers, as well as your ears in some cases!
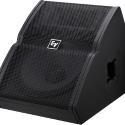
Monitor Speakers
While the main speakers are audience-facing, monitor speakers are directed towards the performer. The purpose of monitor speakers is for the performers to hear themselves play. Some setups only involve the main speakers in a PA system. We will be discussing this further in the later chapters to give you a broader picture.
Basic PA System Setup Diagram: Common Examples
The setup examples here will depend on the number of sound sources that are going to be playing all at once. You also have to keep in mind the layout of the setting as well. These aren't strict guidelines but they serve as good starting points. Here we have:
-
Intimate Venues
-
Collaborative/Band Setup
-
Large Venues
Intimate Venues
Scenario: Below is a modest sound system setup diagram that doesn't require a lot of input. This involves a presenter, karaoke Singer/Songwriter, or a single musician.
Presenter Setup

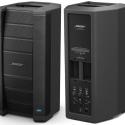
Typical for presenter and karaoke, in a simple PA system, the microphone is connected directly to a powered speaker. This type of speaker has a built-in mixer.
Singer/Songwriter/Musician Live Sound System Setup
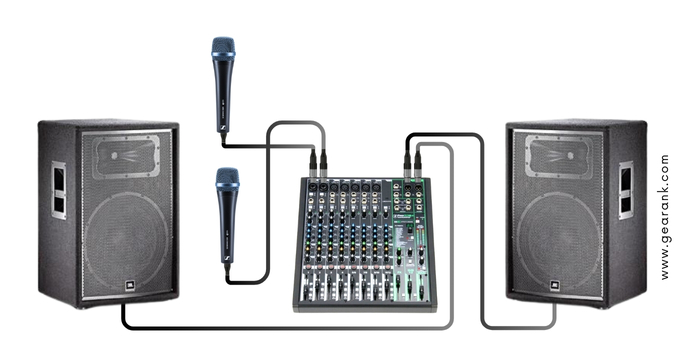
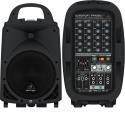
The same presenter/karaoke speaker setup can be used by solo or duo musicians. However, the built-in mixer should have at least 2-4 inputs for multiple instruments. One good example of this speaker is the Behringer Europort PPA500BT. Some speakers would also have EQ and onboard effects such as compressor and reverb for convenience. This simple setup is one of the most common pa sound systems DJ use.
To accommodate more inputs, you can interject a standalone mixer inbetween the mic and the speaker. This three-way routing is a more practical solution for multiple music and sound sources. Mixers are also useful for those who are planning to add outboard effects via aux channels. Adding an audio interface and a computer can turn this setup into a working home recording studio setup.
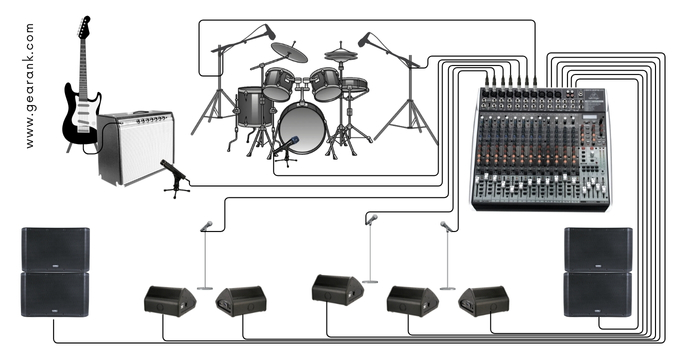
Collaborative/Band Setup
Scenario: Band setups and church sound systems.

Mic placement is really important to consider when setting up for a band. The challenge for bigger setups is that, the more mics you add, the more prone it is to get some feedback on the speakers.
Knowing the layout of the stage beforehand is key to knowing where the mics are placed in their designated spots. Unlike smaller solo setups, monitor speakers or in-ear monitors with their effects will be helpful in this scenario.
If you're using monitor speakers, place them below the performers while the bottom of the mic is pointed downwards. There should also be enough distance between the performer and the monitors to avoid feedback.
You would also have to use different mics for different instruments. Dynamic mics are often used for vocals, guitar amps, percussions and drum kits. Condensers for drum overheads to capture the high frequencies. Guitars and Basses can also connect directly to a mixer with a DI box (built-into an amp or as an extra gear).
The mixer should have enough inputs to accommodate the number of instruments and be placed in the middle of venue for better monitoring.
Because of how the many pieces needed for this setup, some bands opt to rent PA sound systems.
Large Venues
Scenario: Closed or open-air concert halls
Concert venues demand more speakers to cater to a broader amount of concertgoers. More speakers are often needed, and powerful ones at that. Subwoofers may also be needed in cases where low frequencies have to be emphasized.
In closed venues, the subwoofers placed near the walls would sound louder. In this case, place the subwoofer 2-3 feet away from the walls.
For big open-air venues, it's more efficient to use a line array PA system for wider coverage.
For large venues, it is advisable to:
-
Have wireless microphones and backups.
-
Use IEMs.
-
Subwoofers to create a powerful low-end.
Consider Your Speaker Type
It is also important to know the area of coverage of your speakers.
Wide dispersion speakers' area of coverage is around 90° while narrow dispersion speakers have about 40° degrees of coverage.
For solo or presenter setups, it is preferable to have wide-dispersion speakers. The sole purpose is to capture the audience with a "wider net" so to speak.
Whereas, in a concert venue, it is better to choose narrow dispersion speakers and spread it across the venue.
With the speaker type in mind, we can now elaborate on the speaker placement. The rationale behind this is that…
Speaker positions are best maximized if you choose the right type of speaker for a particular setting.
Speaker Positioning
Speakers should be able to provide 180 degrees of horizontal sound coverage from the stage. You can imagine this area of coverage as a semi-circle. That's the area you need to disperse your sound.
If you put the speakers on the floor, the sound dispersion would only cover what's adjacent to the speakers. For optimal coverage, it is ideal to elevate the speakers with speaker stands.
With multiple speakers, make sure they are set apart. As for stage monitors, it's a good idea to aim each monitor speaker at the center of the room.
Setting Up Mixers
To avoid mix-ups, it's good practice to always have labels on each channel on your mixer. This wouldn't matter as much on solo or presenter-type setups. In medium-sized or concert settings, however, it will go a long way.
As previously mentioned, proper mixer placement should be considered, especially for medium to larg setups. be in the middle of the stage for medium to larger setups. If that's not possible, have someone go in the middle to check for connections and the levels.
Some live bands have a designated player (like the drummer or pianist) handle the sound mixing. If this is the case, make sure they can reach both their mixer and instrument for tweaking the bass and drum EQ, adding effects, and more.
Setting Up Microphones
You could go either choose wired or wireless microphones for setting up PA systems. For wireless systems, just keep in mind that you need to be within range.
Regardless of what you choose, microphones should not be positioned in front of speakers nor should they point at the speakers. A single microphone can be placed towards the front of the stage, away from other instruments to avoid feedback.
The same principle applies regardless if you're setting up for a presenter or large venues. If you are using multiple microphones, you have to be extra mindful of where the speakers are situated. This is especially true for monitor speakers. With that, be mindful of where the microphone and where each instrument's microphone are angled.
Connecting Channels With Cables
Once everything's set in place, it's time you connect all the components to their designated channels.
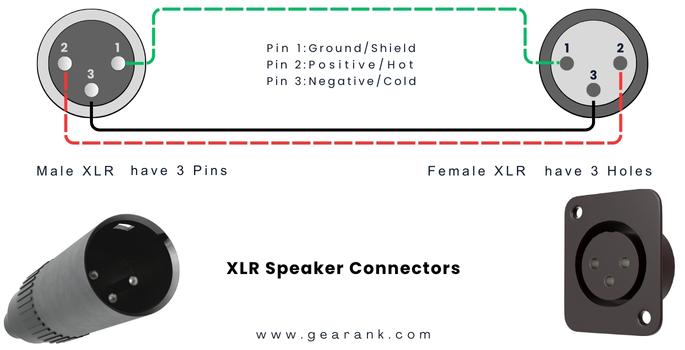
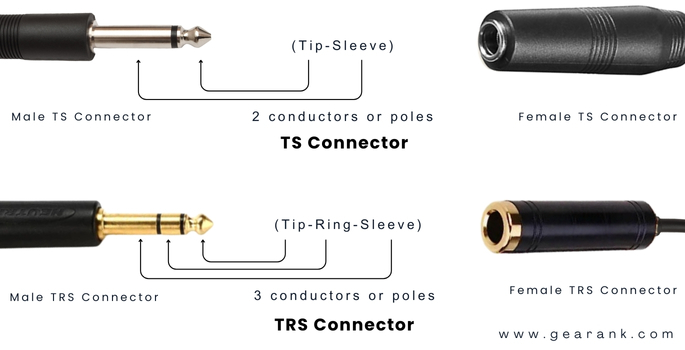
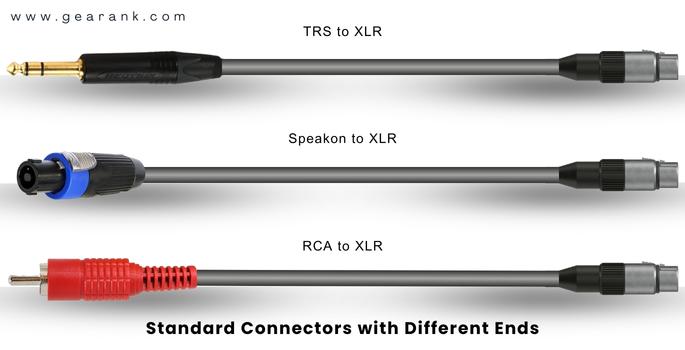
There are two types of cables used in these systems. These are TS or TRS cables, and XLR cables.
-
An XLR cable is used to connect microphones to your mixer, and then your mixer to your amplifiers, to one or more speakers.
-
TS and TRS cables are used to connect instruments like electric guitars to your mixer. TS has one strip, while TRS has two. TS cables carry 1 signal (mono). Conversely, TRS can output a stereo signal and has a much lower signal-to-noise ratio. They're also known as unbalanced (TS) and balanced cables (TRS).
-
Speakon cables are designed for connecting speakers on the mixer. They have a locking mechanism for avoiding accidental disconnections.
Using the right cable for the correct channels is vital. Otherwise, you could hear lots of noise or have a weak signal output. Because of this, you need to choose whether you will use a balanced or unbalanced cable.
Once you have the connectors set in place:
-
Connect each end of your XLR to the microphone and into the mixer. In wired mics, the female XLR is connected to the mic, while the male end goes to the mixer.
-
TS or TRS connections go to the LINE level input.
-
The Speakon connector goes to the speaker. The XLR end goes to the mixer.
Powering Your PA System the Right Way
PA systems have to be powered up in the proper order to avoid unexpected noise, pops, and even physical damage. If done improperly, you will hear a loud pop from one of the main outputs. So, you need to learn the order of equipment to run power through.
Make sure that every volume and gain level is set to zero as this avoids the sudden voltage going through the units.
Sound engineers would always abide by this rule…
First one to go in, last one to go out.
-
Switch on any input that goes into your mixer. This includes wireless microphones and electronic instruments.
-
Turn on the mixer.
-
Then, turn on your amplifiers or loudspeakers.
When powering down your gear and equipment, do the order in reverse.
-
Turn off the loudspeakers first.
-
Turn off the mixer second.
-
Turn off mics and other electronic instruments.
One tip for down your powered speakers and amplifiers. Give each amplifier and powered speaker time to discharge. A powered speaker can still contain power for a few moments even after you cut the source.
Wait a moment after switching off your powered speakers before powering off the mixer and any mixer input equipment.
Run A Simple Sound Check
-
Raise the gain and volume of each instrument on the mixer.
-
Let each member of a band play individually to check the sound of each instrument. Ask each performer to play at full volume.
-
Find the proper balance, then ask them to follow up with a softer play for further adjustments.
Tips For Setting Up Basic PA Systems
I promised you some tips and tricks for setting up your PA system so here they are. Check them out below and keep them in mind!
1. Avoid Feedback
Feedback is when a microphone picks up its signal in a PA system, and loops it around. This creates a ringing noise that increases in volume. It is something all sound engineers must avoid.
To prevent feedback, follow the following advice:
-
Avoid pointing microphones and speakers at one another. This is how feedback loops start.
-
Main speakers away from the microphone. For portable PA systems with presenter setups, angle it toward the audience to prevent feedback.
-
Get a separate monitor speaker or IEM to hear yourself better when performing. If opting for monitor speakers, put them behind the microphone.
The main cause of a feedback loop is that the microphone and speakers are placed too close together. Increase the distance between them and face them away from one another.
There are cases where feedback inevitably happens in medium or large-sized venues when you increase the volume. In these cases, you might need to "ring out the frequency" using an equalizer.
A quick way to do it is to:
-
Determine whether the feedback belongs to the low, mid, or high frequency.
-
Go through each band in that frequency bracket.
-
EQ out the frequency.
2. Avoid Tripping Hazards
Once all your gear is connected and their power source, you will notice a lot of long cables lying around the place.
It's always good to get to know the venue beforehand. Place them in spaces where the band, staff, and the audience aren't walking around. If that's unavoidable place gaffer tapes on them so that they're bundled up securely.
These are trip hazards and they need to be sorted before you go on stage. After all, the last thing you want is to fall on stage and hurt yourself!
2. Use A DI Box
When using electric instruments like an electric guitar or bass guitar, you will notice a lot of noise coming through their signals.
This is because both an electric guitar and an electric bass guitar output high-impedance signals. These are more prone to noise and have lower sound quality when run over a longer cable.
This is where a DI box comes in.
DI boxes convert the signal so it reduces noise and allows you to run a longer cable between your electric guitar and whatever it inputs into (mixer, amplifier, etc).
Key Takeaways
Using our basic PA system setup diagram and our suggestions here should give you a good starting point. The same principles apply regardless of scale (presenter or concert setups). All you have to remember is:
-
Set up mics, mixers, and speakers in a straightforward fashion.
-
Find the proper distance and angle to prevent feedback.
-
Soundcheck and determine the proper balance.
Contributors:
Alexander Briones - Editor / Co-writer
Jerry Borillo - Illustrator